LinkedHashMap
LinkedHashMap
如何使用LinkedHashMap实现LRU缓存?
上一节我们讲了一个重点容器HashMap,其内部实现比较复杂,工作中和面试中都经常被涉及。本节,我们再讲解一个容易跟HashMap混淆的容器LinkedHashMap。LinkedHashMap是HashMap的增强版,既能实现快速的增删改查操作,又能实现容器内元素的有序遍历。借助这个特性,利用LinkedHashMap可以轻松实现LRU缓存,具体如何来做呢?带着这个问题,我们来学习本节的内容吧。
一、整体结构:哈希表+双向有序链表
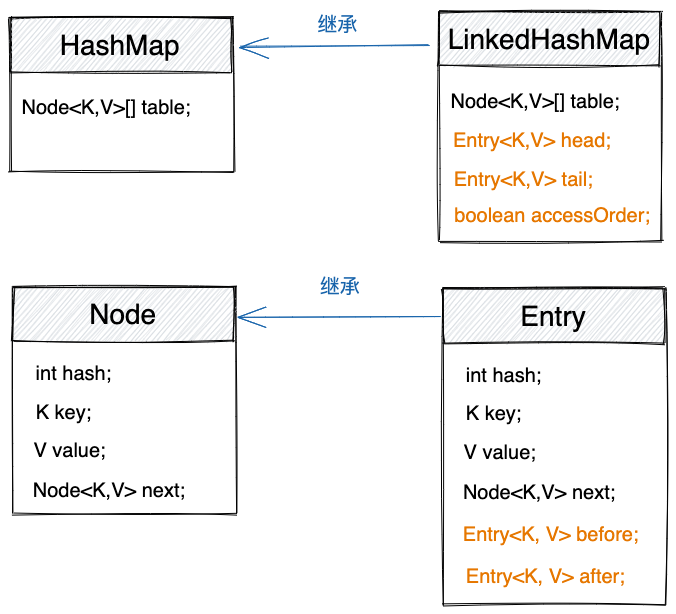
上一节,我们讲到,HashMap底层使用哈希表来实现,并且基于链表来解决哈希冲突。键和值包裹为如下Node节点,存储在table数组的链表中。
public class HashMap<K,V> extends AbstractMap<K,V>
    implements Map<K,V>, Cloneable, Serializable {

  static class Node<K,V> implements Map.Entry<K,V> {
    final int hash;
    final K key;
    V value;
    Node<K,V> next;

    Node(int hash, K key, V value, Node<K,V> next) {
        this.hash = hash;
        this.key = key;
        this.value = value;
        this.next = next;
    }
    //...省略getter、setter等方法...
  }

  transient Node<K,V>[] table;
  //...省略其他属性和方法...
}
LinkedHashMap继承自HashMap,并且增加了排序功能。键和值不再包裹为Node节点,而是包裹为Entry节点,如下代码所示。
public class LinkedHashMap<K,V> extends HashMap<K,V> implements Map<K,V> {
    static class Entry<K,V> extends HashMap.Node<K,V> {
        Entry<K,V> before, after;
        Entry(int hash, K key, V value, Node<K,V> next) {
            super(hash, key, value, next);
        }
    }

    transient LinkedHashMap.Entry<K,V> head;
    transient LinkedHashMap.Entry<K,V> tail;
    final boolean accessOrder; //在双向链表中的排序方式
}
LinkedHashMap中的Entry继承自HashMap中的Node,Entry中的next指针用来将节点串联在table数组的链表中。Entry中新增的before、after指针,用来将节点串联在一个有序的双向链表中。head、tail便是有序双向链表的头指针和尾指针。accessOrder控制双向链表的排序方式,accessOrder默认为false,此时,双向链表按照节点插入的先后顺序排序。当然,我们也可以通过LinkedHashMap的有参构造函数,将accessOrder设置值为true,此时,双向链表按照节点访问的先后顺序排序。示例代码如下所示。
Map<Integer, String> lmap = new LinkedHashMap<>(16, 0.75f, true);
lmap.put(2, "a"); // 2
lmap.put(5, "b"); // 2->5
lmap.put(18, "c"); // 2->5->18
lmap.put(5, "d"); // 2->18->5
lmap.get(2); // 18->5->2
Set<Entry<Integer, String>> entrySet = lmap.entrySet();
for (Entry<Integer, String> entry : entrySet) {
  System.out.println(entry.toString());
}
//输出的结果为:
//18=c
//5=d
//2=a
LinkedHashMap与HashMap、Entry与Node之间的关系及其包含字段的差别,我们用一张图总结了一下,如下所示。
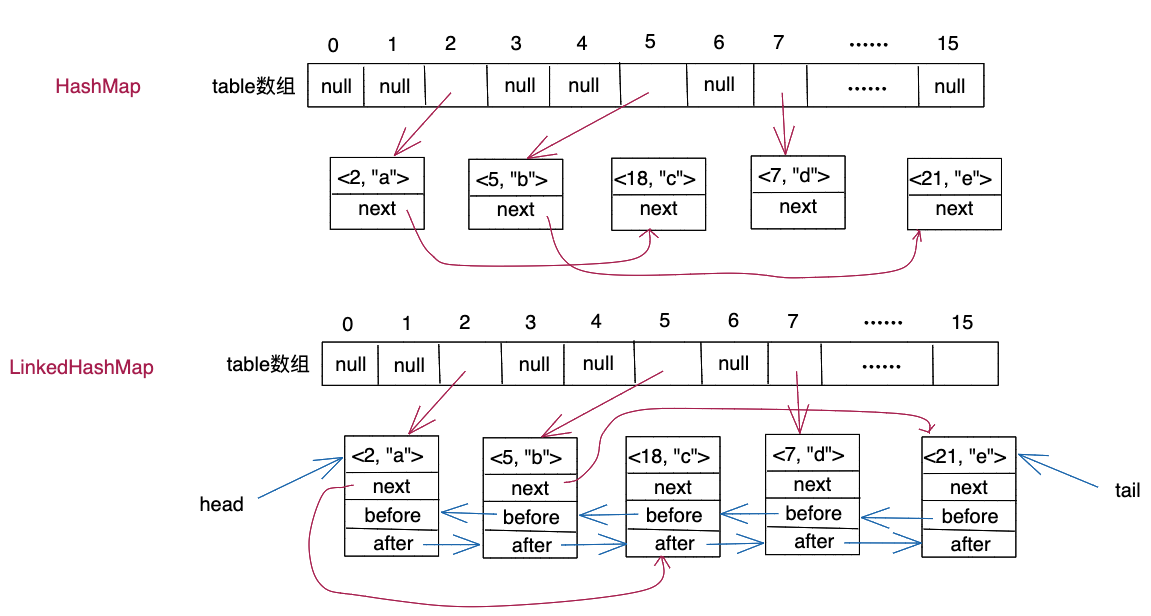
如果我们将键值对<2, "a">、<5, "b">、<18, "c">、<7, "d">、<21, "e">分别存储到HashMap和LinkedHashMap容器中,那么对应的底层存储结构如下图所示。为了简化,下图并非具体的内存结构图,而是经过抽象之后的示意图。在LinkedHashMap容器中,每个节点都有两个“角色”,一个是作为table数组的链表中的节点,一个是作为双向有序链表中的节点。
二、通过entrySet()输出有序的元素集合
尽管哈希表这种数据结构主要是为了快速增删改查,但是为了方便开发,不管是HashMap还是LinkedHashMap,都提供了遍历其内部键值对的方法。在Map接口中,定义了三个方法来返回内部数据,如下所示。
//Map接口中的方法
Set<Map.Entry<K, V>> entrySet();
Set<K> keySet();
Collection<V> values();
这三个方法的用法和实现方法大同小异,我们拿entrySet()举例讲解。如下代码所示。我们通过entrySet(),获取到HashMap中的所有键值对,然后再进行遍历。以下代码包含三种遍历方式。其中,for-each循环只是一个语法糖,其底层通过迭代器来实现(下一节会详细讲解)。forEach()函数是Java8中的引入的函数式编程语法,其作用跟for-each循环类似(这部分在函数式编程中讲解)。
Map<Integer, String> map = new HashMap<>();
map.put(2, "a");
map.put(5, "b");
map.put(18, "c");
map.put(7, "d");
map.put(21, "e");

// for-each循环
Set<Entry<Integer, String>> entrySet = map.entrySet();
for (Entry<Integer, String> entry : entrySet) {
  System.out.println(entry.toString());
}

// 迭代器遍历
Iterator<Map.Entry<Integer, String>> itr = entrySet.iterator();
while (itr.hasNext()) {
  System.out.println(itr.next().toString());
}

// forEach()函数,函数式编程,Lambda表达式
entrySet.forEach(e->System.out.println(e.toString()));
entrySet()函数如下所示,entrySet()的返回值并非HashSet,而是一个特殊的Set,叫做EntrySet。
public Set<Map.Entry<K,V>> entrySet() {
    Set<Map.Entry<K,V>> es;
    return (es = entrySet) == null ?
           (entrySet = new EntrySet()) : es;
}
EntrySet的设计非常巧妙,它是HashMap的内部类,不承载任何数据,只是提供了一些方法,用来访问外部类(HashMap)中的数据,如下所示。
final class EntrySet extends AbstractSet<Map.Entry<K,V>> {
    public final int size()  { return size; }
    public final void clear() { HashMap.this.clear(); }

    // for-each遍历和迭代器遍历
    public final Iterator<Map.Entry<K,V>> iterator() {
        return new EntryIterator();
    }

    // forEach()遍历
    public final void forEach(Consumer<? super Map.Entry<K,V>> action) {
        Node<K,V>[] tab;
        if (action == null)
            throw new NullPointerException();
        if (size > 0 && (tab = table) != null) {
            int mc = modCount;
            for (int i = 0; i < tab.length; ++i) {
                for (Node<K,V> e = tab[i]; e != null; e = e.next)
                    action.accept(e);
            }
            if (modCount != mc)
                throw new ConcurrentModificationException();
        }
    }
}

//迭代器
final class EntryIterator extends HashIterator
    implements Iterator<Map.Entry<K,V>> {
    public final Map.Entry<K,V> next() { return nextNode(); }
}

abstract class HashIterator {
    //...省略其他属性和方法...
    final Node<K,V> nextNode() {
        Node<K,V>[] t;
        Node<K,V> e = next;
        if (modCount != expectedModCount)
            throw new ConcurrentModificationException();
        if (e == null)
            throw new NoSuchElementException();
        if ((next = (current = e).next) == null
             && (t = table) != null) {
            do {} while (index < t.length
                         && (next = t[index++]) == null);
        }
        return e;
    }
}
从上述代码实现中,我们发现,迭代器和forEach()函数在代码实现上稍有不同,但遍历顺序是相同的,均是按照下标从小到大的顺序,依次遍历table数组中的各个链表。本小节的示例代码中,键为2、18的键值对存储在table[2]对应的链表中,键为5、21的键值对存储在table[5]对应的链表中,键为7的键值对存储在table[7]对应的链表中,所以,for-each循环、迭代器和forEach()函数输出的结果均为如下所示。
2=a
18=c
5=b
21=e
7=d
抛开设计,从实现的角度来说,我们完全可以把EntrySet中几个函数,搬移到外部类HashMap中。这样HashMap就不需要借助EntrySet,直接就支持for-each循环遍历、迭代器遍历、forEach()遍历了。而之所以没有这么做是因为,作为数据结构,哈希表并不支持遍历操作,HashMap作为哈希表的封装类,其提供的方法理应符合哈希表的特性。HashMap通过引入EntrySet,从用法上给人一种将哈希表中数据放入另一个数据结构中,通过操作另一个数据结构来实现遍历的感觉,避免了让人感觉HashMap违反了哈希表不支持遍历的特性。
实际上,在JDK8中,为了支持函数式编程,HashMap中也定义了forEach()函数,如下代码所示。HashMap中的forEach()函数的代码实现,跟EntrySet中的forEach()函数的代码实现,几乎相同。不过,这只是为了支持函数式编程做的妥协,所以,HashMap并没有因此也提供iterator()函数。
@Override
public void forEach(BiConsumer<? super K, ? super V> action) {
    Node<K,V>[] tab;
    if (action == null)
        throw new NullPointerException();
    if (size > 0 && (tab = table) != null) {
        int mc = modCount;
        for (int i = 0; i < tab.length; ++i) {
            for (Node<K,V> e = tab[i]; e != null; e = e.next)
                action.accept(e.key, e.value);
        }
        if (modCount != mc)
            throw new ConcurrentModificationException();
    }
}
也就是说,我们不仅可以在entrySet()的返回值上调用forEach()函数,还可以在HashMap本身上调用forEach()函数。示例代码如下所示。
Map<Integer, String> map = new HashMap<>();
map.put(2, "a");
map.put(5, "b");
map.put(18, "c");
map.put(7, "d");
map.put(21, "e");

// 在EntrySet上调用forEach()
Set<Entry<Integer, String>> entrySet = map.entrySet();
for (Entry<Integer, String> entry : entrySet) {
  System.out.println(entry.toString());
}
entrySet.forEach(e->System.out.println(e.()));

// 在Map上调用forEach()
map.forEach((key, value) -> System.out.println(key + "=" + value));
搞清楚了HashMap的entrySet()之后,我们再来看看values()和keySet(),values()返回的是实现了Collection接口的Values类,keySet()返回的是实现了Set接口的KeySet类。Values和KeySet的设计和实现思路,跟EntrySet非常类似,我们就不一一讲解了,读者可以自行阅读源码。
以上HashMap遍历键值对的方法,LinkedHashMap都支持,只不过比HashMap多了一个特性:支持有序遍历。在本小节开头的示例代码中,如果我们将代码中的HashMap改为LinkedHashMap,如下所示,代码依旧可以工作。
//HashMap改为LinkedHasMap
Map<Integer, String> map = new LinkedHashMap<>();
map.put(2, "a");
map.put(5, "b");
map.put(18, "c");
map.put(7, "d");
map.put(21, "e");

// for-each循环
Set<Entry<Integer, String>> entrySet = map.entrySet();
for (Entry<Integer, String> entry : entrySet) {
  System.out.println(entry.toString());
}

// 迭代器遍历
Iterator<Map.Entry<Integer, String>> itr = entrySet.iterator();
while (itr.hasNext()) {
  System.out.println(itr.next().());
}

// forEach()函数,函数式编程,Lambda表达式
entrySet.forEach(e->System.out.println(e.()));
将HashMap改为LinkedHashMap之后,代码的输出结果变为如下所示。输出结果的顺序跟键值对插入的先后顺序一致。
2=a
5=b
18=c
7=d
21=e
那么,LinkedHashMap是怎么做到有序遍历的呢?
LinkedHashMap定义了LinkedEntrySet、LinkedKeySet、LinkedValues三个类。这三个类的代码实现类似,我们拿LinkedEntrySet举例讲解。LinkedEntrySet的源码如下所示。在LinkedEntrySet中,迭代器和forEach()函数遍历的对象不再是table数组,而是双向链表。双向链表默认按照节点插入的先后顺序排序,所以,for-each循环和forEach()函数遍历输出的结果也就有序了。
final class LinkedEntrySet extends AbstractSet<Map.Entry<K,V>> {
    public final int size() { return size; }
    public final void clear() { LinkedHashMap.this.clear(); }

    public final Iterator<Map.Entry<K,V>> iterator() {
        return new LinkedEntryIterator();
    }

    public final void forEach(Consumer<? super Map.Entry<K,V>> action) {
        if (action == null)
            throw new NullPointerException();
        int mc = modCount;
        LinkedHashMap.Entry<K,V> e;
        for (e = head; e != null; e = e.after)
            action.accept(e);
        if (modCount != mc)
            throw new ConcurrentModificationException();
    }
}


final class LinkedEntryIterator extends LinkedHashIterator
    implements Iterator<Map.Entry<K,V>> {
    public final Map.Entry<K,V> next() { return nextNode(); }
}


abstract class LinkedHashIterator {
    //...省略其他属性和方法...
    final LinkedHashMap.Entry<K,V> nextNode() {
        LinkedHashMap.Entry<K,V> e = next;
        if (modCount != expectedModCount)
            throw new ConcurrentModificationException();
        if (e == null)
            throw new NoSuchElementException();
        current = e;
        next = e.after;
        return e;
    }
}
三、插入、删除、修改、查找的实现思路
对于LinkedHashMap,插入、删除、修改、查找这4个基本操作,不仅需要操作哈希表,还要操作双向有序链表。因为LinkedHashMap继承自HashMap,其中,操作哈希表的逻辑已经在HashMap中实现了,比如扩容、treeify等,直接复用即可。LinkedHashMap只需要实现操作双向有序链表的逻辑。正因如此,LinkedHashMap中的代码并不多。
1)插入键值对
新增的键值对会被包裹成Entry节点,通过next指针串在table数组的对应链表中,同时,通过before、after指针串在双向有序链表的尾部。双向链表的有序性是在元素插入、删除、更新、查找的过程中动态维护的。不管哪种排序方式(按照插入顺序或访问顺序),将新键值对插入到双向链表的尾部,双向链表仍然有序。
将Entry节点串在table数组对应的链表中的逻辑,已经在HashMap中实现,直接复用即可。将Entry节点串在双向有序链表尾部的代码如下所示。
// link at the end of list
private void linkNodeLast(LinkedHashMap.Entry<K,V> p) {
    LinkedHashMap.Entry<K,V> last = tail;
    tail = p;
    if (last == null)
        head = p;
    else {
        p.before = last;
        last.after = p;
    }
}
我们知道,在插入键值对时,哈希表有可能会扩容,这并不会影响双向有序链表,所以,对于扩容,LinkedHashMap复用HashMap中的逻辑即可,没有任何新增逻辑。
2)删除键值对
删除键值对时,对应的Entry节点会从table数组对应的链表和双向有序链表中删除(更加精准的表述应该是脱离,unlink)。删除操作不会破坏双向链表的有序性。
将Entry节点从table数组对应链表中的删除的逻辑,已经在HashMap中实现,直接复用即可。将Entry节点从双向有序链表中删除的代码如下所示。
void afterNodeRemoval(Node<K,V> e) { // unlink
    LinkedHashMap.Entry<K,V> p =
        (LinkedHashMap.Entry<K,V>)e, b = p.before, a = p.after;
    p.before = p.after = null;
    if (b == null)
        head = a;
    else
        b.after = a;
    if (a == null)
        tail = b;
    else
        a.before = b;
}
3)修改键对应值
对于哈希表,修改键对应的值,其结构不需要调整。对于双向有序链表,这个要分情况来看。如果双向有序链表是按照插入顺序来排序的,那么不需要对其结构进行调整。双向链表仍然有序。如果双向有序链表是按照访问顺序来排序的,修改键对应的值,也是一种访问,所以,为了保证双向链表的有序性,需要调整双向链表的结构,将这个被修改的节点,移动到双向链表的尾部。对应的代码如下所示。
void afterNodeAccess(Node<K,V> e) { // move node to last
    LinkedHashMap.Entry<K,V> last;
    if (accessOrder && (last = tail) != e) {
        LinkedHashMap.Entry<K,V> p = (LinkedHashMap.Entry<K,V>)e,
                                 b = p.before, a = p.after;
        p.after = null;
        if (b == null)
            head = a;
        else
            b.after = a;
        if (a != null)
            a.before = b;
        else
            last = b;
        if (last == null)
            head = p;
        else {
            p.before = last;
            last.after = p;
        }
        tail = p;
        ++modCount;
    }
}
4)查找键值对
对于按照插入顺序排序的双向链表,查找键值对不会影响双向链表的有序性。但是,对于按照访问顺序排序的双向链表,查找键值对时,会将键值对对应的节点,移动到双向链表的尾部。其对应的代码实现,也是上述的afterNodeAccess()函数。
四、利用LinkedHashMap实现LRU缓存
LRU缓存我想你应该不陌生吧。缓存会预设一个大小,当缓存满了之后,优先淘汰访问时间最早的数据。LRU缓存有以下几个基本操作:查找、插入、更新、删除。
其中,插入、更新、删除操作都要涉及查找操作,比如删除操作需要先查找到要删除的数据,插入操作需要先查找是否已经插入。为了快速查找,我们需要将数据组织成支持快速查找的数据结构,比如哈希表。
当插入数据时,如果缓存已满,需要淘汰访问时间最早的数据,如果通过遍历来查找访问时间最早的数据,那么势必会影响插入操作的性能。所以,我们需要维护一种数据结构,能够快速的查找到访问时间最早的数据,比如双向有序链表。
而LinkedHashMap底层便是哈希表和双向有序链表的结合,所以,利用LinkedHashMap可以轻松实现LRU缓存。不过,LRU缓存一般都会限制缓存大小,当缓存超过这个大小限制之后,才会触发淘汰操作。那么,限制缓存大小这部分功能,如何通过LinkedHashMap实现呢?
LinkedHashMap在设计时,已经帮我们考虑到了这一点。在调用put()函数添加好元素之后,会调用afterNodeInsertion()函数完成一些额外的收尾工作,代码如下所示。如果removeEldestEntry()函数返回true,则会删除双向有序链表中的第一个节点,如果双向有序链表是按照访问时间排序的,那么第一个节点就是访问时间最早的节点。
public V put(K key, V value) {
    return putVal(hash(key), key, value, false, true);
}

final V putVal(int hash, K key, V value, boolean onlyIfAbsent, boolean evict) {
    //...省略添加元素的操作...
    if (++size > threshold)
        resize();
    afterNodeInsertion(evict);
    return null;
}

void afterNodeInsertion(boolean evict) {
    LinkedHashMap.Entry<K,V> first;
    if (evict && (first = head) != null && removeEldestEntry(first)) {
        K key = first.key;
        removeNode(hash(key), key, null, false, true);
    }
}
removeEldestEntry()函数默认直接返回false,也就是说,默认情况下,LinkedHashMap中的afterNodeInsertion()函数并不会做任何操作,所以,如果我们希望在缓存满了之后,能够删除访问时间最早的节点,需要重写removeEldesetEntry()函数。
protected boolean removeEldestEntry(Map.Entry<K,V> eldest) {
    return false;
}
综上所述,我们定义了一个LRUCache类,让其继承LinkedHashMap类,并重写了removeEldestEntry()函数,具体代码如下所示。
public class LRUCache<K, V> extends LinkedHashMap<K, V> {
  private int cacheMaxSize; //缓存大小限制

  public LRUCache(int size) {
    super((int) (size/0.75f + 1), 0.75f, true);
    this.cacheMaxSize = size;
  }

  @Override
  protected boolean removeEldestEntry(Map.Entry<K,V> eldest) {
    // this.size()返回LinkedHashMap中元素的个数
    return this.size() > cacheMaxSize;
  }
}
上述代码并不难理解,我们重点解释一下其中的一个细节。通过super()调用LinkedHashMap的构造函数时,第一个参数initialCapicity传入的值为size / 0.75f + 1,这个值是怎么来的?
因为LinkedHashMap的动态扩容需要扫描所有的键值对,所以,尽量减少动态扩容能够有效提高LinkedHashMap的效率。如果LinkedHashMap的table数组的大小为n,那么当元素个数大于n*loadFactor时,就会触发动态扩容。反过来,如果我们能预估存储在LinkedHashMap中的数据量(size),那么可以在创建LinkedHashMap对象时,通过调用有参构造函数,指定initialCapacity的值为size/loadFactor+1(这里的加一是考虑到无法整除,存在四舍五入的情况),这样就不会再触发动态扩容了。
除了以上实现方式之外,我们还可以使用匿名内部类来实现LRUCache,具体代码如下所示。
public class LRUCache<K, V> {
  private int cacheMaxSize;
  private LinkedHashMap<K, V> lmap;

  public LRUCache(int size) {
    this.lmap = new LinkedHashMap<K, V>() {
      @Override
      protected boolean removeEldestEntry(Map.Entry<K,V> eldest) {
        // this.size()返回LinkedHashMap中元素的个数
        return this.size() > cacheMaxSize;
      }
    };
    this.cacheMaxSize = size;
  }

  public V get(K key) {
    return lmap.get(key);
  }

  public void put(K key, V value) {
    lmap.put(key, value);
  }

  public void remove(K key) {
    lmap.remove(key);
  }
}
五、课后思考题
1)请借助HashMap和LinkedList两个容器,重新实现LinkedHashMap。
2)对于LRU缓存,除了哈希表加双向有序链表这种实现方式之外,还有其他方法哪些实现方式呢?